Sunday, January 27, 2013

French Country Side Table on the CHEAP!

I've been on the look out for some new side tables for our bedroom.  I wasn't necessarily looking for matching tables just cute French Country styled.  I came across this baby the other day on craigslist and had to pick it up.  It was close to perfect but when I actually got it I loved it even more!  The post showed the general shape but I had no idea it had such detail.  Check it out:


I was a little disappointed that the table is actually plastic, not wood, but for my purposes it would serve just as well. 
 
I gave it three coats of Rustolium 2x white spray paint in between other projects and brought it in.   I set her up in our bedroom and she looks great!  Exactly what I had been looking for. 


I love being able to use my design creativity on the CHEAP!  Here's the break down:
 

My Table:                                                                                Inspiration Table:
-$6 table on craigslist                                                               -$610 via The Well Appointed House
-$3.44 Rustolium spray paint


How's that for getting just as much bang for your buck?  It just goes to show that anyone can have the great look they want without paying an arm and a leg for it.  You just have to take the time to look around a bit!
 
Thanks for reading,
Aleasha


Saturday, January 26, 2013

Bathroom Cabinet Face Lift

Boy have I been a busy lady today!  Two reasons for that really 1) Taylor is at her dads for the weekend and 2) Evan and I didn't put in any over time this weekend which almost never happens.  I took full advantage of my uninterrupted Saturday and completed not 1, not 2 but THREE projects today.  I feel pretty accomplished I must say. 

I'm going to share one with you now!

When we moved in our bathroom was a color I named (lovingly of course) "stick of butter yellow".  In our townhouse the bathrooms were purple/green and brown/turquoise.  Since we downsized here to only one bathroom I decided to start over.  Plus, we got some great bathroom items given to us for my bridal showers. 

*Side Note*
I thought having one bathroom would be terrible since we got full use out of two before but as it turns out, it's lovely.  I only have to clean one, only one toilet paper roll to find empty and our clothes only end up in one bathroom to pick up after baths.  Plus we don't have bathroom items traveling back and forth (so when I'm looking for the nail clippers they're always in the same place!).

Here's the bathroom when I started. 


Long story short, I painted.  After removing MORE wall paper boarder-ugh!  I decided when picking towels for our registry that gray and yellow would be the color scheme.  Wait yellow? Like the yellow I just painted over-yep.  I'm in love with gray lately and probably would have found a way to incorporate it in every room but I stuck with less is more of one color and did 1/2 the dining room and then the bathroom.  Here's what it looks like with the new color:

 
I love it.  But it doesn't really scream the look I was going for.  The bathroom was kind of country bumpkin with wood grain linoleum, wood trim and this wood vanity/medicine cabinet.  Plus it has dated gold fixtures.  They're on my style hate list right up there with wall paper. 
 
First thing's first, I removed the gold cabinet pulls and sanded everything down real well with "paint remover" sand paper.  That's what the package said anyways.  :)
 
 
I taped off around the lights and behind the mirrors.  Time to paint the bathroom cabinet!  I didn't take any pictures of this process for fear of getting paint on my new camera.  For whatever reason I am a really clean painter but you wouldn't know it by the condition of my hands afterwards. 
 
When I was done I replaced the pulls with some super sleek brushed nickle knobs.  These babies were $3.29 each ($15 for FIVE?!) but I found them on sale for .99 cents each at random while waiting for paint to be mixed one day.  I couldn't refuse a great bargain!  I always seem to find things for future projects on sale when I'm there to buy supplies for my current one.  I like that about me lol.  My husband does not hehe. 
 
 
Today you basically get a before and after.  I'm sure some readers appreciate a shorter post for once.  TRUTH!


BEFORE/AFTER


There she is in a few different lights.  I think one can appreciate the beauty in color when seeing it under different circumstances.  That's right peeps, I painted it BLACK!  How's that for a facelift?  I was unsure it would turn out right and honestly a little scared (can you believe that?) to begin with.  I am so happy I went for it, I should just know to trust my gut by now.  It's sleek, it's modern and oh so clean looking.  I even got a "WOW" out of Evan!

Here's a few close ups of the cabinet fronts.


Do you love???  I do.  It really looks like it was purchased this way.  Such a statement piece.  This was the easiest and least time consuming project I've done for a while and it could be my favorite as far as impact goes. 

Thanks for following along!

Monday, January 21, 2013

Chevron Closet Makeover

Today I'm sharing my Sunday afternoon project with you all! 

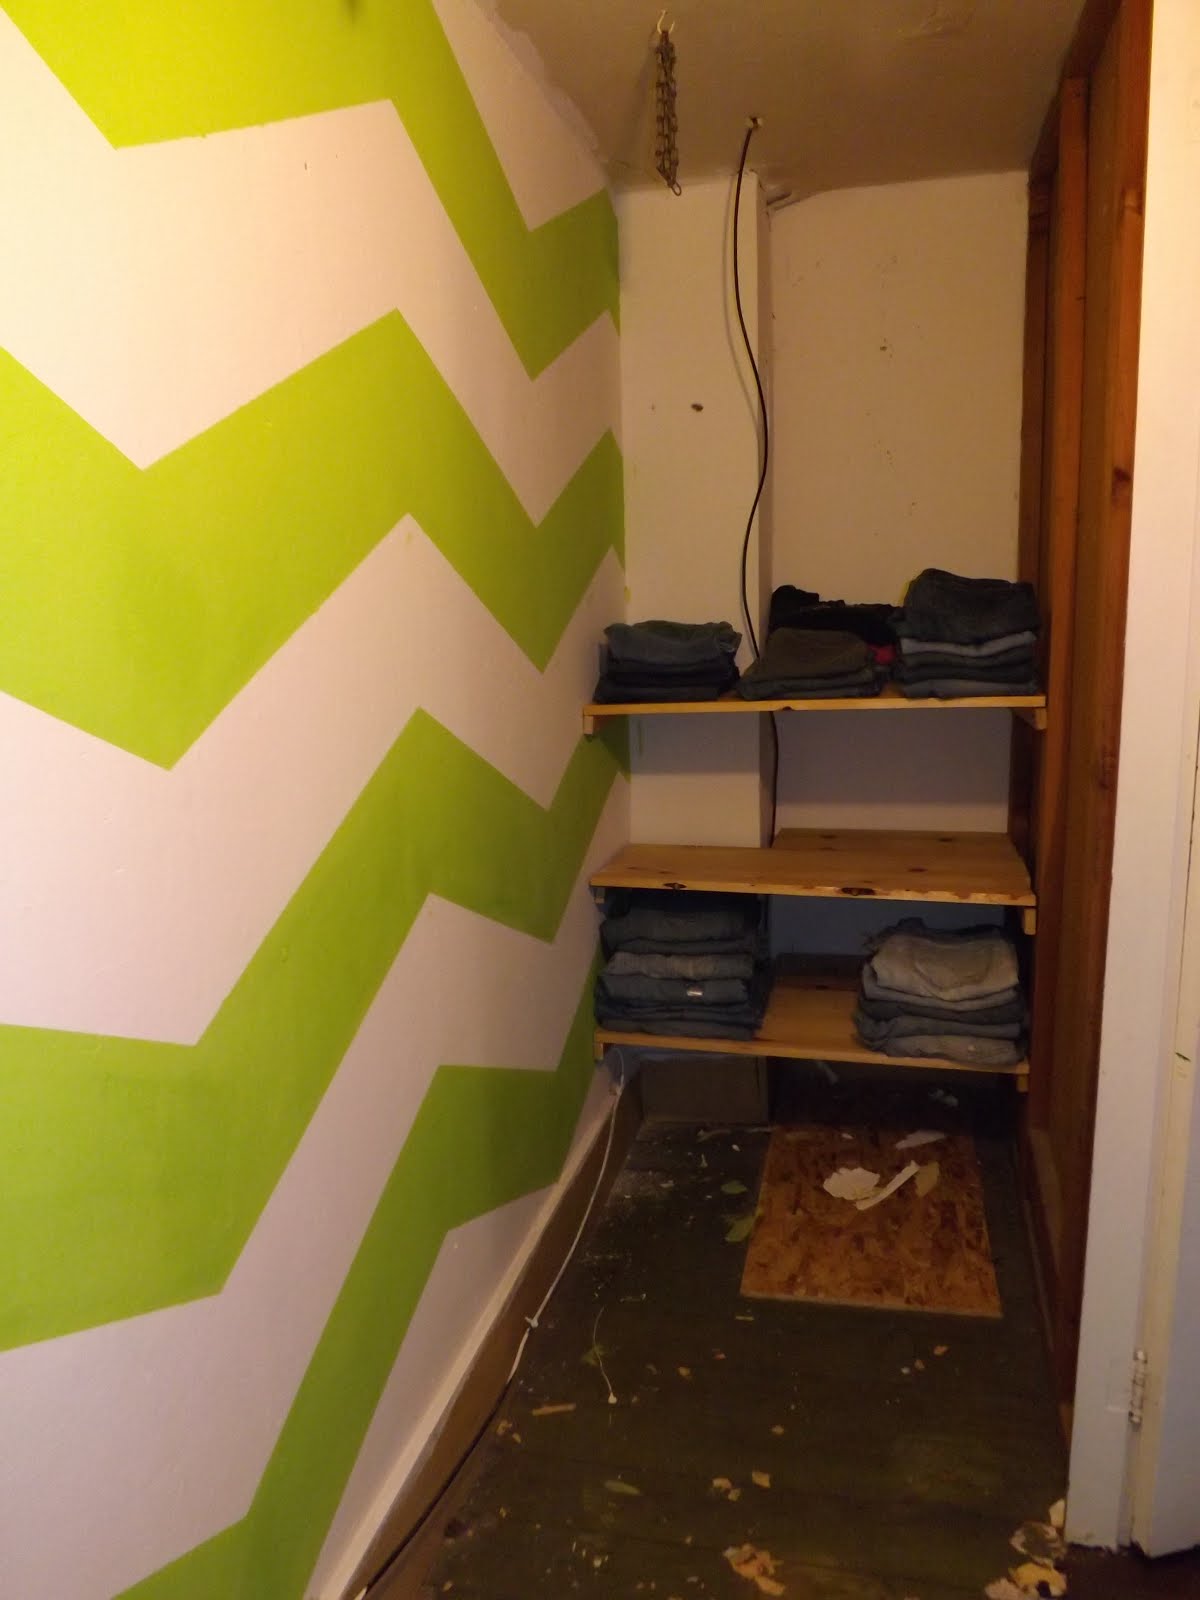
I've been wanting to give our bedroom closet a makeover since we moved into our new house in October.  Here's the deal:  This closet is HUGE compared to what we've had in the past and when I first saw it I thought we would have more space than I knew what to do with.  These pictures were taken after my hubby removed all of the contents so it looks pretty bare.  Rest assured that this long, skinny closet has such a bad layout that it did not function for us. So lets look at the start...


On this end were three wooden shelves which we actually reused in the final product.  They were deep and great for storing folded clothes.  As you can see there is a bracket for a clothes rod in the middle of the wall.  We actually installed this because there was no hanging storage what so ever.  BUT-once we got clothes on there we had about 4 inches between the clothes and the outer wall.  It wasn't very ideal for getting in and out or trying to SEE anything.  Basically upon entering the closet you got a face full of clothes!
 
Ahh yes, the other side.  There are so many problems here it is overwhelming.  To start, this room did have carpet but we pulled it up expecting the same wood floors in the bedroom that I figured I would eventually paint.  See that big piece of plywood?  Well if you lift it up there is actually a gaping 8" hole underneath that looks like it used to encase duct work of some sort.  So the plywood stays until we figure out a solution. 
 
 
On the left hand side is the chimney, it's a problem throughout multiple rooms in the house.  :/  Plus there was severe damage to the plaster which the former owners covered with duct tape?? Yep. 
 
 
The wall paper was pealing and there's random cable cords running around.  Plus there were tin can lids covering other holes in the floor.  I never knew this used to be the standard way to fix them.  Kinda cool :)


So I stripped the wallpaper...both layers. 
 
(insert more duct tape patch jobs) 


and gave the room a clean coat of white paint.

Evan hung our new closet rods on what used to be the shelf end.
 
 
Then hung the shelves on the other end.  He had to cut out a corner so they'd fit in around the awkward chimney. 
 
 
Then I taped for my beautiful Chevron Stripes!


After that I headed out to the garage where my love had cut an 8 foot section of crown moulding into four 2 foot sections.  I had purchased some spray paint earlier in the week in a sweet bright green.


I sprayed up my 4 sections with two solid coats and they were looking fantastic. 


While these dried outside I went to work painting my Chevron.  I had eyeballed the green color when I bought paint and it is literally the exact same.  Turns out I have a pretty accurate eye! :)


I bet you're wondering what I have planned for that crown aren't you?  Let's just say shoe storage has been a problem for a long time in my closet.  In the past I have used this thing which is adjustable but it sits on the floor which isn't ideal.  I always stub my toe on it.


After seeing a picture on Pinterest I decided to go ahead with the crown idea.  It works wonderfully.  :)


If you're wondering what the brown stuff is, its a thick denim like fabric I had on hand from our apartment.  It used to hand in the basement on the unfinished ceiling (to cut down on the cobwebs and make it look more finished).  The wall its on now in the closet wasn't finished and drywall wasn't really in our budget or timeline for this project.  I just used some upholstery tacks and pinned it up.  I think it gives the room a sort of soft feel, It's pretty neat looking in person I promise.
 
Look how great these shelves work out for my ever growing shoe collection!  Plus, there's room on the other side for more as it continues...muah ha ha!


Isn't it neat how they hang right on there by the heels? 


Of course this room isn't quite done yet.  I still need to do something about the trim, it's right where it started in 100 year old crusty tan.  The floor needs some help too but I haven't made a final decision on where to go with it.  I'm contemplating super high gloss white.  Yes? 
 
I have to say I'm really happy with the progress I made on what should have been a lazy Sunday afternoon.  A place for everything and everything in its place.  That's what we've been trying to implement around here. 


This is a good start.  :)
DIY Show Off

Tuesday, January 15, 2013

Kindergarten Christmas Treats

Hi folks!
I'm sitting on my big comfy couch enjoying some fabulous Christmas wreath treats. Basically the rice crispy treat recipe with frosted cornflakes substituting. Except, they also have green coloring and red hots for "berries"! They are the yummiest thing ever and one of my favorite childhood treats. I can still picture them on our rounded "island" counter top as a child. :)

I spent 8 full hours yesterday dedicated to making my daughters first school Christmas party a real treat. I woke up at 6am to utter disbelief that school had indeed been cancelled due to the fantastic blizzard conditions eastern Iowa has endured over the last couple days.

Here you see the amount of road Evan and I could see on our way home Thursday afternoon around 11:30am. VERY faintly in the lower left hand corner of the dash. Its actually a HIGHWAY there. Fun right? Glad my hubby does the driving. We're fortunate enough to both work for the VA Hospital not only in the same building, but for the same DEPARTMENT! We have the same supervisor, all in all, a great set-up because I almost never have to endure this Iowa winter crap.


No school, Bummer. As a result, daycare and Evan and I's co-workers got to enjoy the treats. Lets face it, no way in heck i was giving our ONE 5 year old all the sugar benefits! Look how cute they were though! Santa Hat brownies, peanut butter Reindeer cookies, Peppermint kiss pretzels and Christmas Holly treats.....

We did have a decent Christmas lunch though thanks to one of our great co-workers, Doug. He planned a get together without anyone knowing and my treats were just added extra!
 Hope you enjoyed my snow day update :)


Saturday, December 22, 2012

Mirrored Mosaic Tables


Back to business today...my fun new DIY project!


        A while back, I purchased this great set of tables. Two end tables with a matching coffee table.  They are dark wood, chunky (like I like) and very sturdy.  The entire set was....wait for it....$25 on craigslist!  Can you believe that?  I was pumped.  Craigslist is full of "wish I could afford that's" and "that's ridiculously priced" items but these were the REAL deal, a REAL steal. Let's be honest, I was expecting more from the photos, even though the ad claimed damage from plants, ect.  I got them and we've used them as-is for about 6 months now.  Here's the before:


Definite damage as you can see.  There are actually significant round water marks when the previous owner had plants sitting. 


Lets talk materials.

You will need:


-A plastic bag
-A hammer
-Gorilla Glue (or some other permanent adhesive)
-White grout
-Mirrors (I picked mine up a while back on sale at Walmart.  6-12" squares for $5)
-A sponge and old towel


I started by painting the tables.  In preparation for painting I gave both tables a light sanding with 220 grit sand paper.  It is important to rough up the surface so your paint has something to stick to.  It also helps even out any dings or imperfections in the wood.  Next you wipe everything clean with soap and water and clean up any extra dust with a dry cloth. 


I gave everything 3 coats of white paint.  I used Rustolium Semi-Gloss white.  Spray paint is SO much easier to use than the ol' brush and bucket and it doesn't leave brush marks or drips (if you're careful)  The finish is smooth and fabulous! 


THEN came the fun part.  By fun I mean extremely tedious and time-consuming.  I placed my mirrored panels in the plastic back and gave them a good whack. 
I began placing the broken pieces on the top to get the placement worked out.  This is like a puzzle with no right answer.  Which is awesome if you like puzzles and don't mind having to try and re-try combinations a lot.  I ended up just gluing as I fit pieces in.  It helps not to over think it. 
This was my Saturday night, a beer and broken glass, I'm not sure I can think of anything more fun :)

I finally completed gluing down all the glass pieces!  One thing to remember is that Gorilla Glue does expand.  You only need a minimal amount of glue and try not to let it seep out the sides or it will expand in the cracks which will cause problems during the next step.

Time to grout!  I bought white grout.  Standard stuff you use for tile floors, it was about $6 for the tub and it is more than enough to do both tables.  I didn't take photos of this part, my bad.  I used a spatula-like tool to spread the grout in all of the cracks.  I wiped off any excess and let it dry.  My product said 15-30 minutes.  I waited about 20 and wiped it down with warm water and a sponge.  I let it dry over night and repeated the grout process.  After it was all dry there was still a film of grout over my mirrors so i cleaned it with a wet rag and then dried everything with a towel. 

I think they turned out great!  Ok, honestly the second one isn't quite done.  I just could not wait any longer to show them!


 Added bonus: the mirrors put a really cool reflection on the wall and ceiling at night!
 I hope you all like it!  There are all sorts of things you could do this with, I encourage you to try your own mosaic project!